Hi, I’m new to Glyphs and creating typefaces generally having just purchased the application after the trial.
I’m struggling with one character in particular and was hoping on some advice on the best ways to cut through a shape and expand a stroke.
The character I’m trying to recreate is this one (originally I made it in illustrator which I’m more comfortable with the tools of).
What I’d like to know is the best way to draw this so that I can create the versions for different weights—or just advice in general on how to use path operations so that the tail can change in thickness in the most efficient way.
Sorry if it is a basic question, but I’d appreciate any advice as there is so much to learn.
Thanks!
mekkablue
March 25, 2020, 8:10pm
2
That is indeed a tricky one.
Draw the circle with the circle tool (Shift-F). And the wavy stroke with the Draw tool (P).
Consider adapting their curvatures a bit with the Fit Curve function.
Expand them with Filter > Offset Curve using the Make Stroke option in the dialog.
Select all (Cmd-A) and copy it to the background (Paths > Selection to Background, Cmd-J)
Now we create the knockout. Select only the wavy stroke: double click one of its path segments.
Expand it again with Filter > Offset Curve, but without the Make Stroke option this time. This should just make it bigger.
If the wavy stroke is not selected after the filter, select it by double clicking it again. Make sure the circle is NOT selected.
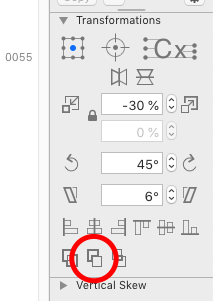
Click on the Subract icon in the Transformations panel:
(Read its tooltip to understand how it works.)
1 Like
Thank you very much for the great advice, it makes sense to me!
I am going to try this now
1 Like