I guess that´s nothing new for a lot, but… I don´t want to go back there, but I remember when I was using FL there was a window where I could write in all kinds of letters and word combinations and do the kerning for all the different combinations.
Is there a similar window here in Glyphs app? When I open the Kerining wondow it´s all blank… if I write anything, nothing happes.
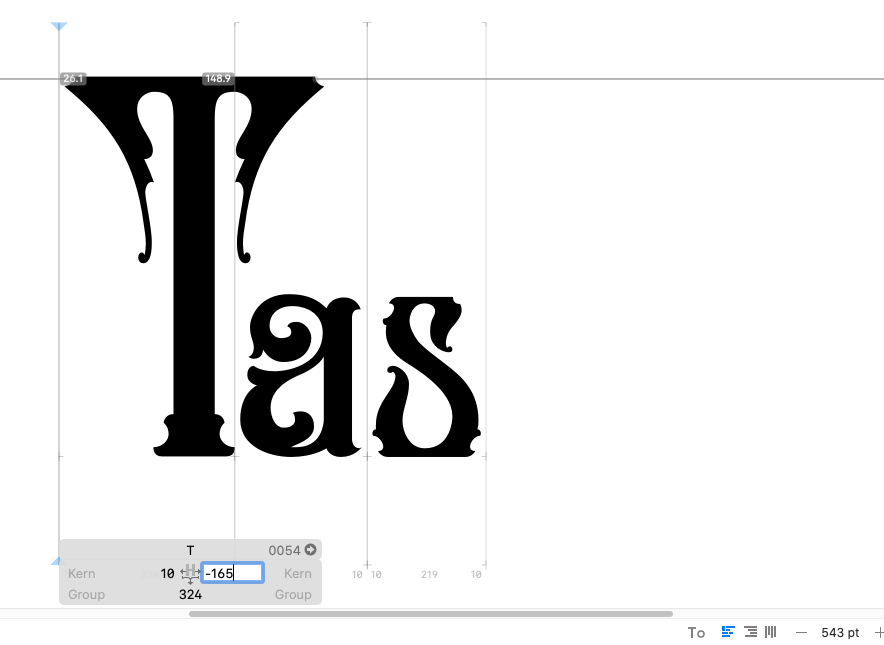
In (T) text mode I understand how to set the values like here… (maybe not how to do it) Lets say I put the right value for the “T” to -165 in the “Tas” combination it looks pretty good, but if I then write a “Tl” the “T” and “l” will overlap each other… obviously the same will happen if I change left value to the “a”. and i have a letter different letter before the “a”.
Hmm, maybe this was a very clumpsy way of trying to explain my confusion, but is there a very easy way to try to explain how to kern all the different letters and words combinations? Or even a good video explaining it?
I dont want to cheat, but I have been reading about the kerning in the Learn section, but I didnt get it… maybe I have to try to read it several times, but is there something I´m obviously overlooking?
Any simple explination or help to get me understanding is very welcome
Can you tell me what exactly you do not understand? Maybe I can improve the text.
In short:
Focus on group kerning first.
Set the groups in List mode. The Set Kerning Groups script will help you.
Group kern. Make use of Sample Texts. The Sample String Maker script will help you.
Then look for collisions and decide whether or not to add a kerning exception or not. For finding the collisions, the Kern Crasher script will help you.
I will try to read it a few more times when I have it quiet around me… I´m not too familiar with scripts, but I will try again (and maybe again) and if still not understanding I´ll get back to this thread.
I guess I´m just used to work in a little different way in FL, and it´s quite some time ago.
I recommend you kern with the keyboard shortcuts in Text mode. You do not need to type numbers.
But again, set the groups first.
All of this is explained in the tutorial. If you care to let me know which sentence in the tutorial left you confused, I can perhaps try and improve the wording. I’ll try and go through it right now.
Hello. The main issue, going by your screenshot, is that you’re not actually kerning, but setting the sidebearing of your T. You’re entering the value in the wrong field. The kerning value is entered in the field which says kern. So leave your T at 10 left and 10 right. Enter -175 in the field where it says kern.
Also, as previously mentioned, set up your groups first, this will spare you a lot of time in the end as you don’t need to kern the same shape combinations every time but just use groups for that.
Sadly, Glyphs does not have a proper kerning interface like FontLab (yet), which is why some people prefer to kern in FL. You can only kern by entering number values (and adjusting these with arrow keys).
@mekkablue I’m reading it again, and I don’t think it’s written in an understandable way, but I guess I was looking for that kerning interface similar to FL and then got a little disoriented plus I have been out of it for quite some time.
Thanks again!
@SCarewe that kern section made it much more clear for me! Thanks a lot!
I would say the kerning shortcuts are by far the most common way to kern. Typing numbers into the Info box works for a quick adjustment here or there but when kerning a font you should mainly use the shortcuts for speed.
The kerning shortcuts can be used with the Text tool. Type the two glyphs in Edit View, then place the cursor between them and hold down the Option and Control keys to change the kerning value between the current and the left glyph with the Left Arrow and Right Arrow keys (⌃⌥← and ⌃⌥→). Hold down Option and Command to change the kerning between the current and the right glyph (⌥⌘← and ⌥⌘→). Hold down Shift for steps of 10.
Mnemonic: the Control key is located on the left, and the Command on the right. Control: left glyph. Command: right glyph.
Thanks a lot! It’s quite fast with the arrow keys!
Starting to get a little hang of it now, and remembered the feeling from old times… beside designing, kerning the enjoyable part when letters starts to look beautiful in different combinations! I like it!
But if I can shoot in another question… I didn’t quite get how to download the scripts. When clicking on the link to the scrips, I can’t see how to download them… I can open them, see then, copy them but didn’t see any download button? I guess I should download and then put it in the script folder right?
With Glyphs open, go to the menu bar at the top of your screen, choose Window → Plugin Manager, and click the Scripts tab at the top of the window. There you can see a list of scripts. Click the Install button next to a scripts collection to install all scripts of that collection.
To use the scripts, go to the Scripts item in the menu bar and choose a script from the menu. You can also assign keyboard shortcuts to scripts in the preferences window (Glyphs → Preferences… → Shortcuts). That way, you can just press a key-combination to quickly run a frequently used script.
If the installed scripts don’t show up in the Scripts menu, hold down the Option key and click the Reload Scripts item. Open the Scripts menu again and you should see all newly installed scripts.
I’m following the kerning post with Glyphs Mini - when I place the text tool cursor between two letters (eg. A and C) to adjust their specific kerning I don’t get the side by side grey info box (A+C). I just see the grey info box for the single letter after the cursor. Am I missing something to get the two grey boxes side by side? Thanks!