When I print a tab with glyphs the output is not black on white, but a dark grey raster.
This is discovered with 1175 and when I updated to 1184, the same result.
Going back to version 1075, the output is black, as it should be. After all, I want to see how my curves are looking at the resolution of the printer and not at the resolution at of a raster image.
Same Mac OS Mojave, same laserJet: difference must be a change in the Glyphs app.
I am trying to design a multiple weights of a design with lots of curves, which means I need to see nodes in the background for consistency and print samples. I usually do this in FontLab, because until recently Glyphs didn’t show nodes in the background. Now that it does, I cannot print samples. I find myself working on a file, for which I do not have FontLab masters, I have to go back and forth between Glyphs versions all the time. So I hope for a solution.
I have never printed anything other than filled outlines, without nodes or metrics. I just tried printing with nodes for the first time in the combination with filled outlines, using 1175, getting light grey characters with barely visible nodes. (the font name, size and date-time is the only black on the page)
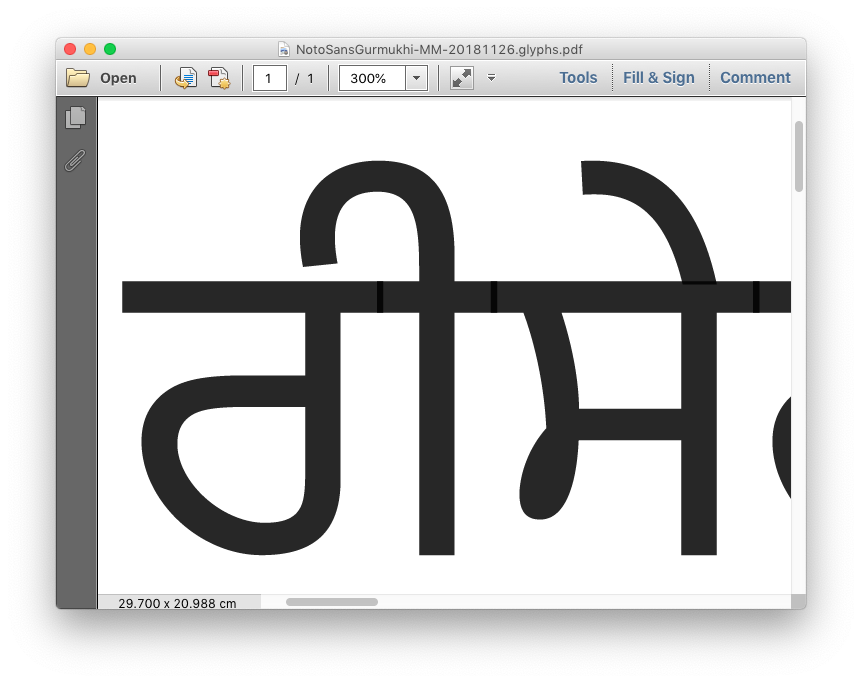
I have never enabled the “Show Nodes”, until you brought it up yesterday. What it does is printing in a light raster instead of a dark raster. There should be no raster at all. If I print to PDF and show you a screenshot enlarged, it shows dark-grey with noticeable darker overlaps in the headline stroke. The PDF output from 1075 shows solid black.
Fill outlines checked
Show nodes not checked
Show metrics not checked
Size 96 pt
For printing a sample there is a difference: There is no longer a visible overlap in the headline. But the characters still print in dark grey raster.
For what it is worth. In the old days I printed with samples with the black being set with one of the predefined system colours. This being a long time ago: a QuickDraw call. The outlines drawn with Quartz, would inherit this color for fill. Only for other colours, I would use Quartz to set an RGB color. But then it was OK to print a raster.
This update crashes as soon as I try to edit outlines, because I have to space-drag the drawing into position, which it doesn’t want to do at all.
I gave it another shot. If the print dialog setting for color matching is set to ColorSync then it is screened. If it is set to “In Printer”, it is solid black. In the version that prints with RBG the color matching setting makes no difference.
According to Adobe, printing with CMYK, 100% black, must result in dark gray rasterised text on a black and white printer, so that you can see the difference between black and deep black, with for instance 60% cyan added. The 100% black in exported PDFs also becomes gray. I think these are idiotic measurements. You have to switch on preferences like “export all blacks as black” or “print blacks as black”. And even then I have encountered several situations where Macs (never PC) could not print pure black on certain printers. Sometimes updating a printer driver helped, but there was one situation where a whole battalion of printing and computer experts could not get a Mac to print without raster. They could solve it only by using a different Mac. Too many variables involved.
Trying again with today’s update: It appears the problem isn’t quite solved. It doesn’t print with screen anymore when changing the print setting. But it looks as if the printer is short of toner, with a structure in black. If I generate fonts and print the same characters in FontLab it is black without structure. It seems both options for color matching do not give solid black. Which suggests Lucas has a point.
I just discovered that it depends on whether I print with the paper orientation in landscape (bad) or or portrait (good). I guess modern technology has advanced beyond the need to be comprehensible to mortals…
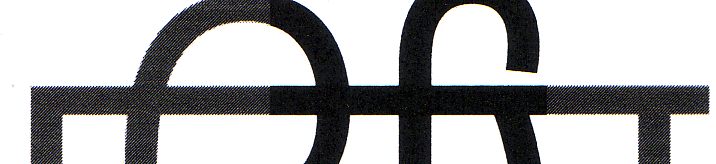
It got weird: I like the ability to print different layers on the same page. With 4 letter samples for 7 masters separated with spaces I can check if I succeeded in consistent modifications of the same character. But suddenly the print alternates between solid and screened “black”. Here is a enlarged scan of a section of the print to show I don’t make this up:
It seems completely random, where it changes from solid to screen in vertical stripes. At the size 96 I get 2 words on a line printing portrait. In three lines I get these transitions, which do not align across lines. Only the sample word on the last line is solid.
Not sure why printing black and white on a black and white printer should be influenced by color profiles.
In the mean time I found out what triggers the strange partial screened characters, that I described on 13 December. It happens when printing a sample that contains spaces (either 0032 or 00A0, but not 200B).
When printing text, the only thing that a space contributes is its advance width. But I can image the situation where a space is ‘printed’, something like filling a shape with zero outlines, may be ignored in some set-ups, but in others resulting in strange effects. And strange it is.
1 space: the right side of the character in front of the space is overlaid with grey raster. If I decrease the advance of the space, the width of the grey expands. If I make the advance of the space larger, it shrinks. After the space, characters are solid black.
2 spaces in a row: same as one space
2 spaces in different places: black-gray-space-grey-black-gray-space-black.
Only explanation I can think of is that Glyphs sends some form of printing code or formatting to the printer for the spaces, rather than just using the advance width for positioning the pen.